Showing posts with label free motion quilting. Show all posts

Tuesday, September 9, 2014

2 Minutes Quilting; 30 Minutes Ripping

I saw a really lovely border design I wanted to try - the one at the bottom of the picture:

(courtesy of Green Fairy Quilts)
(Check out her blog; it's awesome!)

Yeah...., Although I did trying drawing it on paper first, and really wasn't able to consistently emulate her beautiful consistency, I decided to give it a shot.  My quilting didn't look any worse than my drawing, but I discovered my brain really balked - a lot of "duh..., which way now."  Spastic!  I like free motion quilting, but wasn't enjoying trying to make this design.

As with anything, my first thought was to keep going; I'm bound to get better.  But I am working on an outer border.  There is going to be too much time spent finishing it to do a design I don't enjoy.

Next up, the nestled circles above it!  :D

Friday, November 25, 2011

When You Have Nothing to Show for Yourself

When you have nothing to show for yourself, well then show someone else's!


My mom finished this king-sized beauty right before Thanksgiving.  Its inspiration was an Asian themed fabric pack. 

If you click on the picture to make it larger, you might be able to see the feather quilting on the green sashing, and the leaves on the black frames.  She did an impressive job.  No one can tell that this was her first attempt at free-motion feathers and leaves.

Gorgeous, isn't it?

Wednesday, September 21, 2011

Oops!

Some free motion quilting adventures fall into the undesirable category.  Having the corner of your backing tucked under and quilting it down as in the photo below is one of them.  Sigh.  

And the leaves looked really good too.....  Rip, rip, rip.

Just as an aside, another thing I've learned is that if you're going to use multiple colors of thread, it may be a good idea to go with a wildly colored backing.  As you can see the non-white thread shows up brightly on the white background.  Not all of my quilting is that pretty either.  However, this quilt will go on my bed, so most people won't know what the back side looks like except me.  (And of course, all of you, because when I'm done, I'll probably post a picture of that too.)

Sunday, September 18, 2011

Adventures in Free Motion Quilting

Although the Pansy Sampler, is not the first quilt in which I've done free motion quilting, it is the first in which I decided to be brave enough to experiment, test my limits, try new patterns.  A sampler quilt is a good vehicle in which to do this, because the variety of blocks offers different challenges.

As of the taking of this photograph, all but two blocks are complete.  Still have a number of purple frames to quilt, about half the sashing, and all of the external borders.

(Click on any photograph to see more detail.  The blogger resizing has taken out much of the texture.)

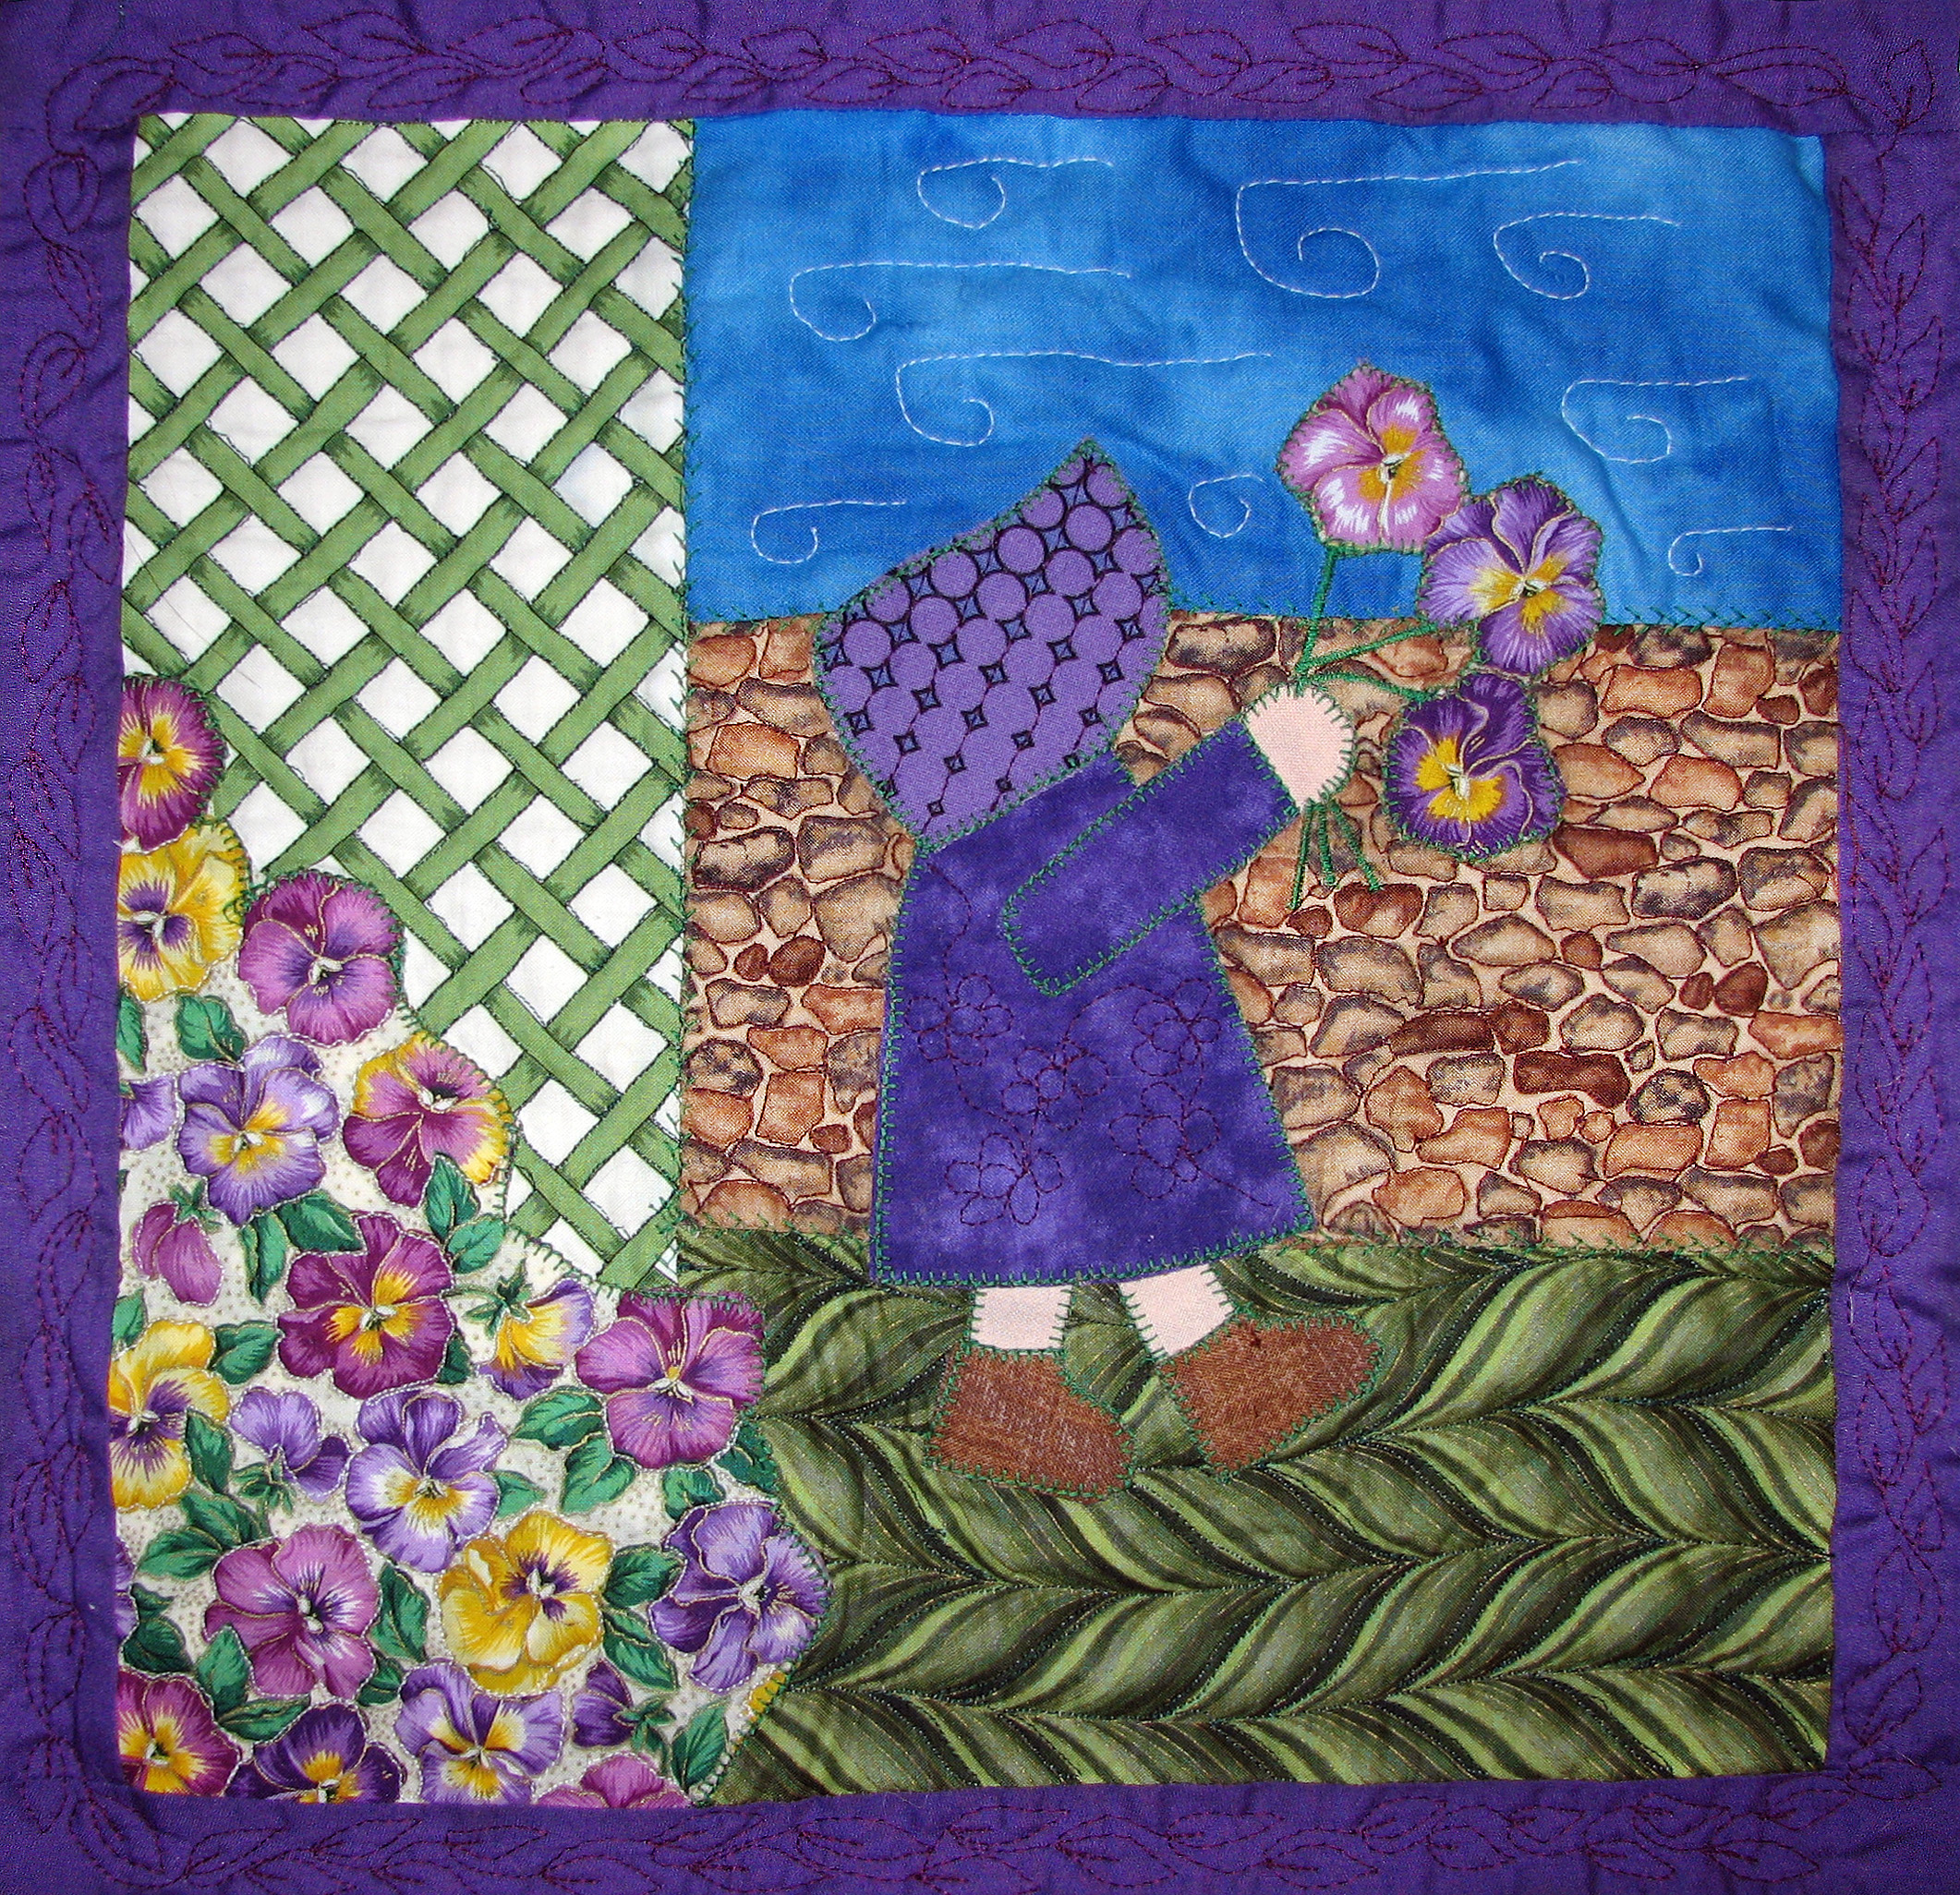
I had one picture block in the quilt ~ this Sunbonnet Sue.  I cannot take credit for the block itself; many of the blocks came in a block exchange, and Sunbonnet Sue was one of them.  I saved quilting this block for near the last, in order to improve my accuracy enough to do the block justice.  I quilted around each of the stones in the wall, each of the squares in the trellis, and all of the pansies.


Quilting on the pansy fabric itself has proven to be a challenge.  The largish print tricks my eye and prevents me from making accurate arcs, etc.  This block shows my attempts at making a quilted "flower" on the largest section of pansy fabric.  It is less than stellar.  Although I've tried a variety of things, quilting around the individual pansies has looked the best.  It's not difficult to do.

I've done free motion leaves in all of the purple frames.  It's a good FMQ design to use, as it's quite forgiving.  However, practice really does make perfect. Despite being a forgiving design, over the course of the quilt, my skill with this pattern has increased markedly.


It is in this block that I tried pebbling for the first time.  I often study Wendy's work for inspiration.  Much of what she does is too far beyond my capability, but pebbling was not.  I was very pleased with the result. 


My favorite quilting motifs are the symmetrical designs as shown in the purple sections below.  They are also the most difficult to do.  The interesting thing is that I've noticed when I merely glance at this block, I think the quilting looks pretty nice.  However, if I stop to study it, then I see all of its flaws ~ and there are many. 


The morning that Eric took all of these pictures for me, Molly Baggins could not help but walk across the quilt ~ usually on the very block he was trying to photograph.  Finally, she chose a spot and made herself comfortable.


Friday, August 26, 2011

Quilting-Crafting Studio

My cousin and I have been looking forward to setting up our Quilting-Crafting Studio since we knew we returning to the house in Newton.  The basement has plenty of space and will be perfect for our needs.  The only problem has been digging out from underneath the pile of boxes.


A few days ago, Lori got inspired and removed the boxes from our space.


Eric moved the desk into place for us, and I found the fabric and unpacked the Juki.  Eventually, there will be shelves to hold the fabric, but in the meantime, the window well works just fine.

Along with the setting up the sewing room, came setting up the office (off camera ~ and the subject of a separate blog post), and organizing all of Eric's computer stuff.  Boxes and boxes of computer stuff.


In the corner opposite the Juki, Lori began setting up a space for scrapbooking.  We're still looking through boxes for all of her supplies.


Despite the area needing more work, I sat down and did some free-motion quilting for the first time in six or seven months.  The good news is that in the interim, the skills I had did not abandon me; the bad news is that I didn't get any better.


I finished this block this afternoon ~ one I began quilting in January or February.  It is far from perfect, but it sure feels good to have completed it.


Tuesday, December 14, 2010

Myra's 2011 PhD (Projects Half Done) Challenge

After reading about Myra's 2011 PhD Challenge over at Quilting in My Pyjamas I decided I'd jump on the Projects Half Done bandwagon.  You see, Projects Half Done could be my middle name.  I've got one flimsy that is probably getting upwards of fifteen years old.  I'm a much better starter than a finisher.  And in the past, I've been a much better piecer than quilter.  I'm trying to remedy the latter by learning how to FMQ.  That said, I'm only committing two projects to Myra's PhD Challenge, as life has a habit of getting in the way of my quilting goals.  Plus, I reserve the right to start a new project and live with the guilt of that fifteen year old flimsy.

PhD #1:  The Scrappy Star.  This project is at least ten years old.  It's now gone through two major moves.  In my defense, this quilt is hand-pieced and the blocks and the inner checked border will be hand-quilted.  In the interest of having this one finally done, I'm going against my obsessive-compulsive nature and will FMQ the last two borders.  At this point, I have 1 1/2 blocks and part of the checked border left to hand-quilt.  All  of the two outer borders still need to be quilted.


PhD #2 is sampler from a block swap.  The swap was called "You Pick" and was hosted by a gal I became acquainted with on RCTQ (rec.crafts.textiles.quilting), a quilting newsgroup.  Each participant chose a focus fabric and sent a 12" square of it to the other participants to make a block.  My focus fabric was a pansy fabric.  I received some gorgeous blocks back.


I have begun free motion quilting the sandwich, and have five of the sixteen blocks done.  I'm doing the sashing as I go.


As you can see since these projects are really more than "half done", I should easily be able to finish them by June.  Now, I only hope that it's true!

Wednesday, December 8, 2010

Free Motion Hand-Quilting

What's a quilter to do?

I love the black and white checked fabric in the first border. It adds a bit of feisty-ness to the quilt. However, I quickly discovered that I was not going to enjoy quilting it. The lines don't run true enough to use them as a guide for any major straight-line pattern, and I couldn't see any way to mark the fabric. Whether I used white or black, part of the markings would always to fade into the fabric.

My apologies for the poor photo quality

Aha! Free-motion hand-quilting. If I can do free motion quilting on a sewing machine, why couldn't I do it by hand? And so, the checked border is filled with free motion flowers and vines.

Click on the photos to make them larger

Alas, I've discovered that as much as I like hand-quilting blocks, I'm not at all fond of hand-quilting borders.  They go on FOREVER.  With a block, I get that sense of satisfaction of having another one done.  Borders take so long that by the time I've finished a side, the thrill is definitely gone.

I've got two more borders to do on this quilt after I finish the checked border, and I'm seriously considering doing them on the machine.  How bad is that?  Would that be considered mixed media?

Monday, August 23, 2010

Grief and a Return to Free Motion Quilting

Some of you are probably asking, did she "leave" free motion quilting?  One would have to leave in order to return, right?  It's a good question.  Since my dad's sudden and unexpected death on August 2nd, I tend to think of everything in terms of "before" and "after".  My parents, paternal grandparents, and I all lived on the same piece of property (the rest of us still do) and my dad's sudden departure was a devastating blow to all of us.

Quilting has always been my refuge; my escape from the stress and annoyances of life.  This time quilting really couldn't be a refuge for me, at least not at first.  There were two reasons for this.

The first was an unwillingness to let go of the intense pain, as if keeping the wound fresh would somehow keep me better connected to my dad.  Through research on grief and eventually through my own experience, I learned that although this is a common reaction, it is a misconception.  Living in the desolation only keeps a person tied to her loved one's death; not his life.  In fact, intense grief actually interferes with the brain's ability to call forth memories about the departed person's life.

The second issue was the association between our quilting machine and my dad.  It was my dad who encouraged my mom and me to splurge and buy the Juki.  (The Juki isn't the most expensive on the market by far, however it was a huge step up from our Wal-mart Brother sewing machine.)  I'd been enjoying showing my dad what I'd been able to learn and do with free motion quilting "before".  I finally had the realization that if I waited to feel truly good before I tackled free motion quilting again, I could be waiting for a very long time.  I decided if I was going to feel miserable, it was better to feel miserable and do something productive rather than feel miserable and do nothing.

I tried doing some free motion quilting, and to my surprise (although in hindsight it makes sense), I found I felt a greater connection to my dad than when I'd been shunning the machine.  I'd been doing a disservice to his memory.  Grief is complicated.

So with the preamble out of the way, on to the free motion quilting itself.  Since I last blogged about my FMQ endeavors, I've finished 3 more blocks.

The stippling you see on the block below is the first I've ever done.  Yep, I sometimes tend to do things backwards, like learning to make feathers before learning to stipple.  In some ways stippling wasn't as easy for me as the feathers.  While it's true that it's not necessary to be too exact when stippling, having to think where I'm going next while paying attention to my stitches took a different kind of concentration.  With the feathers once the spine is stitched, the path is pretty well set.


The next issue I found myself faced with was my purple frames.  I'd thought I would leave them un-quilted, hoping they'd "pop".  Instead, unless the quilt is laying perfectly flat, they just wrinkle.  So I decided I needed to quilt something in the frames too.  They are only one inch wide.  I ran across these free motion leaves and decided to give them a try.  I'm pretty pleased with the result.


Each block seems to present new challenges.  I love the plaid fabric the quilter used in this block.  It was a perfect mix of colors to match the pansy focus fabric.  But how to quilt it?  I finally decided on feathers because I've been getting a lot practice since I'm using them in the sashing.  However, the feathers are buried in the plaid and really aren't noticeable.  Perhaps a more experienced quilter would have come up with something better for the plaid.


I mentioned in my last blog on free motion quilting, that quilting the pansy focus fabric was giving me trouble.  The vibrant pattern does weird things to my brain and the curved pansies mess up the curves I'm trying to quilt.  However, I decided to give it another shot, because these corner squares are not very big and I thought maybe I'd do better working in a smaller space.  HA!  As you can see below, that's not true.  My "petals" are pretty warped.


I was whining  discussing the issue with my mom, and she suggested I just outline the pansies themselves.  This worked much better.  (If you make the photo bigger, I think you'll be able to see the stitching.)  The focus fabric is quilted, and the pansies kind of "pop".  Moral of the story--work with the fabric.


Progress is being made on all fronts, and at this point, it's all anyone can ask for.

Monday, July 26, 2010

If I Can Do Free Motion Quilting, You Can Too!

I've been "going big" (as Elizabeth would say) with free motion quilting the last week or so, experimenting in earnest.  It's time to talk about what I've learned.  I'm hoping I can encourage other free motion newbies to get beyond the intimidation.

1.  Have the right machine for the job.  While quilters do free motion quilting on all kinds of sewing machines from standard home models to longarms, I wasn't able to be successful on my standard sewing machine.  Last year, I attempted free motion quilting on my trusty little Kenmore.  While it is work to shove a big quilt through a standard harp, it can be done.  The issue that made it impossible for me to succeed on the Kenmore is the fact that the Kenmore just wouldn't go slow enough.  If I slowed down enough where I could I manage, the Kenmore stalled.

For me that meant an upgrade to a Juki TL98Q, which is considered a mid-arm.  While the Juki will do 1500 stitches per minute, it will also crawl.  Very good for a free motion quilting newbie.  I realize a lot of FMQ videos show the quilters zipping through the motions at high speed.  This is not appropriate for newbies.  To me, that's like a new driver starting out learning  to drive on the freeway.  Being able to go slow while you build control and confidence is a must in my opinion.  Just to be clear, I'm not dissing standard machines.  If your standard machine can do the job, that's great.  I'm just saying my standard machine wasn't up to the job.

2.  Feathers are the most forgiving FMQ design that you can do after stippling.


You probably don't believe me. If someone had said that to me before I tried feathers, I would have thought she was nuts. Surely a design so beautiful and intricate has to be hard. Nope! Not if you use the Hooked on Feathers technique. Besides the fact that the technique is simple and straightforward, there are other considerations that make these feathers a very forgiving design: 1. They do not have to be perfectly symmetrical to look good; 2. They do not have to be uniform in size to look good; 3. The shape of the feather can vary from rather flat to rather round all in the same design, and it still looks good.

Still don't believe me? Study these close up shots, and you'll see that my feathers are far from perfect.  The feathers are not always shaped exactly the same, are not perfectly symmetrical from one side to the next, and are not particularly uniform.


 Yet the overall effect is still pretty darn good.

3.  Symmetrical designs, even thought they don't appear as intricate as feathers, require more control and concentration than feathers.  Before I actually started experimenting, I thought the little motifs in the following block would be easier than the feathers.  Nope, they are more difficult, because a certain amount of uniformity and symmetry is necessary.


That said, they are still more forgiving than you might expect.  They don't have to be perfect to look all right.  If you click on the picture to see it bigger, you'll be able to see what I'm saying.

Now here is an irony for you.  I started out using thread that matched the fabric as well as I could, thinking that if I had a "craptastic" spot, it would be less likely to show.  That is true.  However, I found that I could see so much better if there was a contrast between the fabric and thread, and that made me less likely to have a craptastic spot.  I'm still debating which is the best way to go.

Another irony is that the focus fabric in this quilt--the pansy fabric--is one of the most difficult for me to quilt.  First off with its several bright colors, I can't see my thread in the pattern as I quilt.  Secondly, the curved lines of the flowers "interfere" with my visualization the curved lines of the motif.  Something weird happens in my brain, that I don't think would occur if the motif was composed of all straight lines.  However, since the thread doesn't show much on the pansy floral, the craptastic spots aren't at all noticeable, so I'll keep on plugging away.  It is getting easier.

I hope this post helps other FMQ newbies to feel a bit braver.  I think the crux of what I'm trying to say in this post, is that perfection is not a requirement.  You don't have to quilt like Wendy at Ivory Spring to achieve decent looking quilting.  And the thing of it is, if you don't get started, you never will quilt like Wendy.  Don't be afraid to take that first step.  Who knows maybe there is one among us who can eventually achieve that type perfection if only we give it a shot.

Okay, you more experienced Free Motion Quilters, any other observations that you can add?

Thursday, July 15, 2010

Two Free Motion Quilting Book Reviews

When trying to learn a new skill, a totally sane person would at least buy a book or a CD on the subject, but not me. I have to muddle awhile on my own first. I need to get my hands into it, know what it feels like so that when I finally do buy that book or CD, the information will make more sense to me.

Having recently jumped into Free Motion Quilting while working on Matt's Quilt, I did indeed get familiar with a range of emotions and spastic moves associated with skill.
  • Ack!  Don't let your mind wander
  • Where the heck am I?
  • This is really cool!
  • I'm on a terrifying rollercoaster
  • Why did my hands do that?!
  • This is going to look like crap.
  • How fun!
  • What the heck am I doing?
In other words, my experience gravitated between horror and loving the possibilities.  So now, I finally decided to order some books on the subject of Free Motion Quilting.

The first book is Free Motion Quilting Made Easy by Eva Larkin.  I got a kick out of the "Made Easy" part of the title.  I had to see.

I'll admit that I was pleasantly surprised to find a lot of the information she provided did indeed make the process seem less daunting.  One of my problems when looking at a quilt is trying to decide how to even get started.  The quilt looks so big, the possibilities for design are wide open (if only my skills were good enough), and I just have no idea how to attack the problem.  This book addresses that issue.  While of course practice is still a must--there is no way around that--what this book does is provide a well-thought out strategy for making wonderful free motion quilting designs with little marking.  She advises breaking your quilting area down into sections no more than 4 1/2" square.  For a 12" block, this results in 9 sections within the block.  Within the 4 1/2" square sections, she shows how to use some very basic shapes--like ovals, triangles, diamonds--to make some very attractive and intricate looking designs.  When I was done perusing this book, I felt much calmer and as though I will be able to do free motion quilting successfully.


The second book is Hooked on Feathers by Sally Terry.  There were two reasons I got this book.  First, I love the look of feathers in quilting, so if there was a chance in the universe I could learn to do feathers, then I wanted to take it.  The second reason is that several quilters have recommended this book as an incredibly easy way to achieve beautiful looking feathered designs.  I'll admit that again I was skeptical.  Feathers that beautiful just couldn't be that easy.  And yet, the technique this talented quilter has developed does provide a way to make beautiful feathered motifs with little marking and much less work than traditional feathers.  When I read about her technique, I was confident I could master it.

Armed with the information, techniques, and tips from these two books, I'm going to start free motion quilting the Pansy Sampler Quilt.  It's not only going to be a sampler by block design, but also in quilting.  The 16 blocks in this quilt ought to provide me with ample opportunity to try out these various quilting techniques.  Unlike Matt's Quilt, this quilt is for me, and so any imperfections will be mine and mine alone.  I am poised with anticipation!

While today's blog doesn't show off any creative achievement, I am going to link up over at Amy's blog for Sew and Tell Friday.  I hope that these book reviews will be inspiring to other free motion quilting newbies like myself.  And since I will be sharing my free motion quilting adventures with my fellow bloggers on Sew and Tell Friday in the future, I wanted everyone to know where the adventure began. 

I'd better to get to pin basting the Pansy Sampler Quilt!

Thursday, June 17, 2010

Another WIP Bites the Dust!

Another WIP bites the dust!

I've been anxious to finish this quilt, because I made it for a friend, Matt. His wife, Robynn, received her quilt for her birthday in April. When I started the two quilts (nearly 2 years ago) I hadn't really intended the quilts to be birthday gifts, but Robynn's was done at the appropriate time, so I couldn't resist sending it to her for her birthday. Matt's birthday followed about 7 1/2 weeks after Robynn's, and unfortunately I just couldn't get his quilted, bound, and washed in the time between their two birthdays. So being late, I'm eager for him to have it.

The quilt measures 66 X 78, and is composed of thirty, twelve inch blocks.

I made this quilt around Matt's favorite color, turquoise. Turquoise is an interesting color. I had always thought of turquoise as being a specific shade of blue; a subset of blue so to speak. However, when I started rummaging through my stash, and looking at fabric online, I realized it wasn't that simple. There are the blue turquoises and the green turquoises. I asked a few fellow quilters which color people mean when they speak of turquoise. As you might expect, I got several different answers. At that point, I decided to use both the blue and green turquoises in Matt's quilt. Delving into the color in earnest, it became obvious that while turquoise may be a subset of blue (or perhaps green), it is so much more than that. The different shades of turquoise are seemingly endless. I began looking at the color in a whole new way. What fun!
Matt's quilt is the first quilt in which I did any free motion quilting. While I did stitch in the ditch around each block and did a significant amount of straight line quilting, I free motioned the "petals" that are the main motif in each block.
I learned a lot about free motion quilting from this experience, but I still have a long way to go:

1.) I got better at controlling speed and motion.

2.) I realized that although my skills will most certainly improve over time (I hope), free motion quilting will never have the same look as machine controlled straight line quilting. However, some people like incredibly talented lady at Ivory Spring get exceptionally close. (For anyone interested in getting tips from a pro, you should check out her blog series articles, "Thread Talk".) Free motion quilting is more art than drafting. Both give wonderful results, but they are distinctly different.

3.) I also decided that perhaps a smaller motif that utilized only 1/4 of the block might have been easier to manage than the petals that ranged over nearly the full 12 inches of the block. I'll give that a try on my next quilt.

So in a nutshell, free motion quilting went from totally terrifying to enjoyably terrifying. HA!

While a quilter always sees the flaws, and things she wishes she'd done a bit differently, I'll say that overall, I'm pretty pleased with the way this quilt turned out. I hope Matt is too.

I'll be linking up over at Amylouwho's for Sew and Tell Friday, and at Lit and Laundry for Finished for Friday. Check out these blogs and see everyone else's wonderful work.

Sunday, May 16, 2010

The Quilting Gods are Laughing


"While you're making plans, God is laughing." I ran across this quote a few weeks ago. Tried to locate it on the Internet this morning so I could quote it accurately and give the proper credit, and darn if I can't find it. (More Quilting Gods mischief? You do know the Quilting Gods walk among as cats, don't you?) I believe the quote was attributed to a Jewish proverb.

My plight, which I will get to momentarily, reminds me of that old quilter's joke:

A quilter dies and when she re-awakens, she finds herself in a huge room full of thousands of bolts of the most beautiful fabric she's ever seen. She turns to a woman sitting at a table nearby, and says, "Oh my, this must be heaven!" However, the woman just glumly shakes her head, and replies, "No, this is hell. There are no scissors."

My problem? Well, it's like this: I've injured my left shoulder somehow. It's a mystery. I'm at that age where one can sustain injuries and have no clue as to what caused them. Yes, that's annoying enough in of itself. However to tie my situation back with the joke above, I have a new Juki TL-98Q--and I can't use it! Machine quilting is the one thing that notches up the pain on the injured shoulder big time.

I've tried to ignore the sore shoulder since I'm finally getting to the place with my free motion quilting where, although I'm still very much a novice, I'm gaining a bit of confidence, and finding it mostly fun rather than terrifying. Heck, the darn shoulder got injured on its own, why should I pay attention to it? Ten days later, and it still feels as bad as on the day the problem first cropped up; that's why.

So now my time in the sewing room is spent machine-piecing on the little Kenmore, and stealing surreptitious glances at the Juki. I swear when I pause to press a seam, I can hear giggling.

Monday, April 26, 2010

Progress on Free Motion Quilting

I'm a free motion quilting newbie, doing free motion quilting on my first quilt. I'd intended that the first quilt be one that I would keep for myself, knowing that my initial attempt would be less than perfect (despite practice). However, it didn't work out that way. Instead my first attempt is on a quilt for a friend.
How did this happen? First off, I'm a slow quilt-maker. Due to time-constraints and the fact that I have a tendency to go off on tangents, it normally takes me about a year to complete one quilt from start to finish. Even knowing this, silly me, I volunteered to make not one, but two quilts for friends of mine, a couple, Robynn and Matt. I gave Robynn her quilt for her birthday earlier this year. (You can view it here.) I machine quilted it using straight-stitching, decorating it with stars and squares. All that turning--I swore never again!

In the meantime, I got a new sewing machine, a Juki TL-98Q, that is perfect for free motion quilting. So here I am now, ready to quilt Matt's quilt. I can't face any more straight-line quilting (unless the lines really are to be straight--no turning the quilt), and I don't feel like I should take the time to quilt another quilt before I do Matt's. After all, it's been nearly two years since I started the two quilts. So, I took a deep breath, and decided to free motion quilt. Just something simple.

I don't yet know how I'm going to quilt the other block in this two block quilt.

As expected, I'm running into the same problems that I expect confronts most new FM quilters. My stitch length changes from day to day and from minute to minute. I can go forwards and backwards better than I can go from side to side. I find that if I can go faster, the quilting looks a bit smoother, but I can also run into trouble much quicker too. All in all though, I'm not disappointed in this first attempt.

I've found that using gloves does help the process. If anyone has any other great tips, please don't hesitate to leave them in the comment section. I can use all the help I can get. :-)

And last, but not least, here is this week's bunch of completed New York Beauty blocks:
I'll be linking up for Sew & Tell Fridays at Amylouwho's. Drop by and check out what everyone else has been up to this week. :-)

Saturday, March 13, 2010

The Reluctant Semi Free Motion Quilter

Ahhh, the best laid plans. I received a lovely border stencil for Christmas. Thought it would be just the perfect thing for doing the final border on the baby quilt. Just one problem. No matter what I tried, the markings I used just didn't show up on the blue polka dotted cloth. I tried a white quilt marking pencil, and the marks disappeared into the white polka dots. I tried regular pencil and still a no go. I considered my pink quilt marking pencil, but I had a bad experience once where the pink didn't completely wash out.

So I adopted an idea from my mom. I drew the stencil on to paper and attached it to the quilt, machine quilting the lines on the paper.


Still, the method wasn't perfect. Somehow my mom has the patience and ability to do this by straight-stitching. Me? I couldn't see well enough to follow the lines using the regular stitching foot so I switched to the smallest free motion quilting foot I had.


Now, I could see very well, but I discovered that when using the free motion quilting foot on my beloved Juki, whether I dropped the feed dogs or not, I was in fact free motion quilting. The free motion foot doesn't fit tight enough to be used for regular stitching. Big deep breath. I took the plunge and started to follow the lines.

I'm not sure if this qualifies as full free motion quilting since I am in fact following a pattern as opposed to visualizing and going where that vision leads. However, it is proving to be a very good learning tool. I don't have to think about where I'm going; I just have to concentrate on moving the quilt properly. And it's working! I'm getting better.

Actually, I'd planned to practice on something inconsequential before diving in to free motion quilting, but it came down to giving it a shot or giving up on putting that beautiful corded quilting pattern on the baby quilt. I decided to give it a shot, knowing I could always rip it out. I'm glad I did.

Now to remove the paper pattern.